SEM sample preparation techniques
Visualizing a biological specimen with an electron microscope is not a trivial task, mostly because of the intrinsic nature of the electron and matter interactions that are responsible for the image formation. In order to be imaged using SEM, the specimen needs a conductive surface and has to be placed inside high vacuum. Thus, biological specimens cannot be imaged in their native state and need to be heavily processed. Accordingly, sample preparation is a crucial step, which represents an essential activity and service in our facility.
Preparation for topography

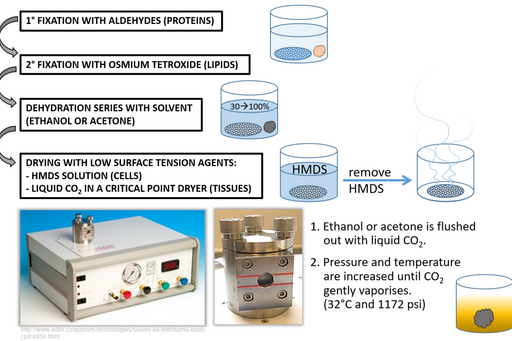
Step 1: Primary fixation with aldehydes (proteins)
Proteins are crosslinked by glutaraldehyde and formaldehyde to stabilise the ultrastructure before further processing.
Step 2: Secondary fixation with osmium tetroxide (lipids)
Blipid membranes are fixed to prevent their extraction by solvents during dehydration. The black osmium precipitate which is formed during this process increases sample conductivity and minimizes image distortions resulting from charging.
Step 3: Dehydration series with solvent (ethanol or acetone)
A fixed specimen is dehydrated by incubation in a series of ethanol or acetone solutions. Solvent concentration is increased gradually so that water is removed gently, without causing specimen shrinkage.
Step 4: Drying
Allowing acetone or ethanol to simply evaporate from sample surface would create artefacts as these solvents have relatively high surface tension and would create micro-ripping of the surface upon leaving. To prevent this, dehydration solvents are replaced either with Hexamethyldisilazane (HMDS) or liquid CO2. HMDS can be used in cell preparations and after a short (3 minute) incubation it is removed and excess is left to evaporate. Liquid CO2 on the other hand is applied to tissues in a critical point drier where it is brought to a critical temperature and pressure point at which it vaporises.
Step 5: Mounting on a stub
The specimen is mounted on a metal stub using a sticky carbon disc which increases conductivity. Silver-containing glue can additionally be applied for even more conductivity.
Step 6: Sputter coating with conductve material
To prevent charge buildup on specimen surface, it is coated with a conductive material, most commonly gold. The metal is applied in a controlled manner in a sputter coater. It is critical that the coating is thick enough to prevent charging (typically around 10 nm) but not thick enough to obscure specimen surface details.

Preparation for array tomography

Array tomography allows collection of images very similar to TEM images, but using a SEM, and from hundres and even thousands of serial sections. These images can then be used to reconstruct a 3D image at ultrustructural detail. This technology requires for the specimen to be embedded in resin and sectioned as per Conventional and microwave-assisted preparation for ultrastructure, High pressure freezing and freeze substitution (HPF/AFS) for immunolabeling and ultrastructure, or Chemical fixation and acrylic resin embedding for immonolabeling. However, instead of on grids the serial sections are mounted on conductive silica wafers or glass substrates.
Successful cutting of so many serial sections is facilitated by two tools: advanced substrate holder (ASH) and AtumTOME – a system for automated collection of sections on a tape. ASH typically allows collection of up to a few hundreds of relatively small sections and the operator is required to mount the sections directly on a wafer. AtumTOME allows collection of up to tousands of larger sections on a steadily moving tape without the operator being present. The tape is then cut into strips and mounted on large silica wafers.